Modify Accreditation – Name Change Application
Introduction
An accredited organization’s name may change due to a number of factors. For agencies and corporations this would include merger, sale, acquisition, ownership changes, or corporate status. For a municipality, a name change would occur due to a change in municipal status resulting from dissolution, amalgamation, or reclassification. This procedure walks through the steps that an accredited organization will follow to submit a name change application to the Administrator of Accreditation (Administrator) through Council Connect.
Key Considerations
This application will be used primarily by accredited agencies and corporations. Only the Minister of Municipal Affairs can change the name of an accredited municipality.1 The notification of the Council of the change occurs through a separate process. However, municipalities in a joint accreditation can use this process if they want to change the name associated with their accreditation. Rather than have the names of all municipalities listed, they may choose to have a single name or acronym (i.e. Palliser Regional Municipal Services).
Tip: Only authorized representatives of an organization will have the appropriate permissions to complete an application for accreditation. Council staff will create and maintain the relationships between individuals and organizations through an application process.
Written notice of their intention to change their name should be provided to the Administrator well in advance of initiating the application process. If that does not occur, it must be submitted as part of the application process. Please be aware that if it is not submitted in advance of the application, it may delay the processing of the request to completion.
Once the name change application has been processed, the organization must apply to amend all Designation of Powers (DOPs) issued under the organization to reflect the new name.
Application Fees
An application fee of $100 per technical discipline covered by the accreditation is charged to process a name change.
Caution: If in doubt as to whether this is the right application to use, contact the Council and ask to speak to a member of the Accreditation department who will be happy to assist you. Council contact information is available here.
Overview of steps
An organization’s authorized representative:
- Provides notice to the Council of a desired name change.
- Prepares the documentation to file in support of the name change.
- Logs into Council Connect and displays the desired organization’s dashboard.
- Submits the completed name change application and pays the fee.
- Receives confirmation of the submitted request.
- Responds to any questions or requests for additional information as required.
- Receives confirmation of the completed change.
Application Steps
STEP 1 – Prepare Required Documentation
a. Written Notice
If written notice has not already been provided to the Administrator, it must be provided as part of the application process through Council Connect. Please be aware that if it is submitted with the application, it may delay the processing of the request to completion.
b. Draft QMP
A Word version draft red-lined QMP, based on the Council’s latest template, must also be uploaded in order to submit the application. The draft QMP must be redlined to display any changes being made to the template. A copy of the templates are available here.
STEP 2 – Log onto Council Connect
In order to view an organization’s dashboard, an individual must be related to the organization and must have the appropriate permissions/role set.
a. Refer to the Organization Dashboard on Council Connect manual document for detailed sign in instructions.
STEP 3 – Access Organization Information
a. After logging on you will see the My Dashboard page. If you are set up as an Account Admin or as a QMP Manager for your organization (or multiple organizations), you will see an Organization Info tab on the My Dashboard page, where you can access the organization information.
b. From the Individual’s My Dashboard page, navigate to the desired organization’s dashboard, click the link to the Organization Info tab.

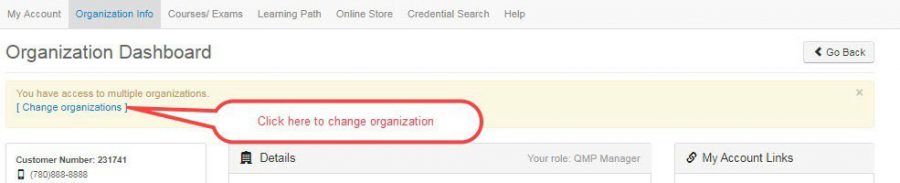
c. Or, if the logged in individual is affiliated with several organizations:
- Click the Organizations You Manage heading to expand the list and display a link to all related organizations;
- Click the link to the desired organization to display that organization’s dashboard.

- To select a different organization, click the Change organizations link at the top of the Organization dashboard.
STEP 4 – Download the Latest Approved QMP
a. On the Organization’s main Dashboard page, locate the QMPs list.
b. Click the expand arrow to display the current and approved QMP on file (if the list is collapsed).
c. To download a copy of the QMP, click the link in the Document column.

Tip: The format of the updated draft QMP submitted with the application must align to the latest version of the QMP template published on the Council’s website. These templates are Word documents and must be redlined to display the proposed revisions.
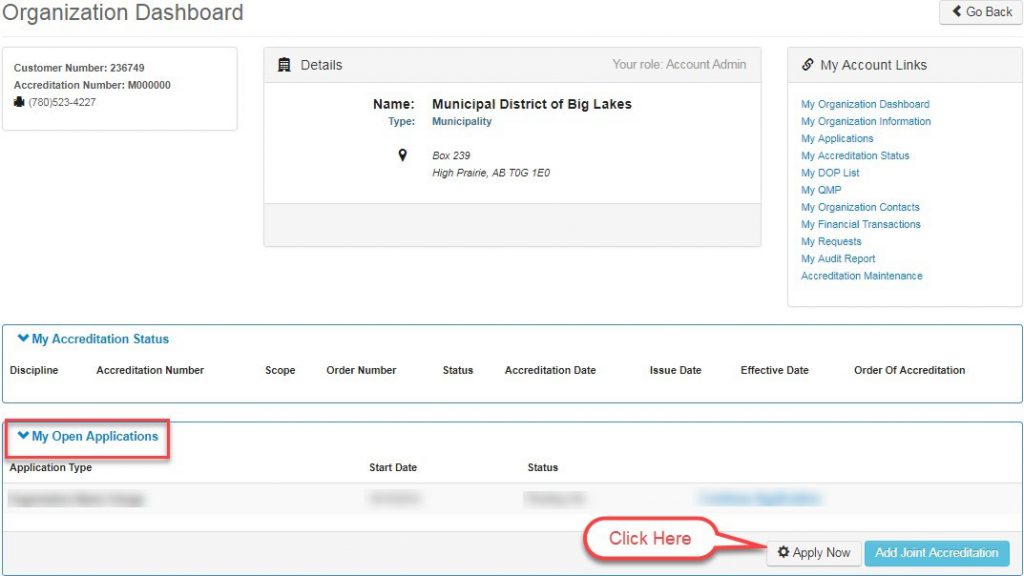
STEP 5 – Start Application Process
a. In the My Open Applications (lower part of the page), click the Apply Now button to initiate an application to voluntarily cancel all accreditations.
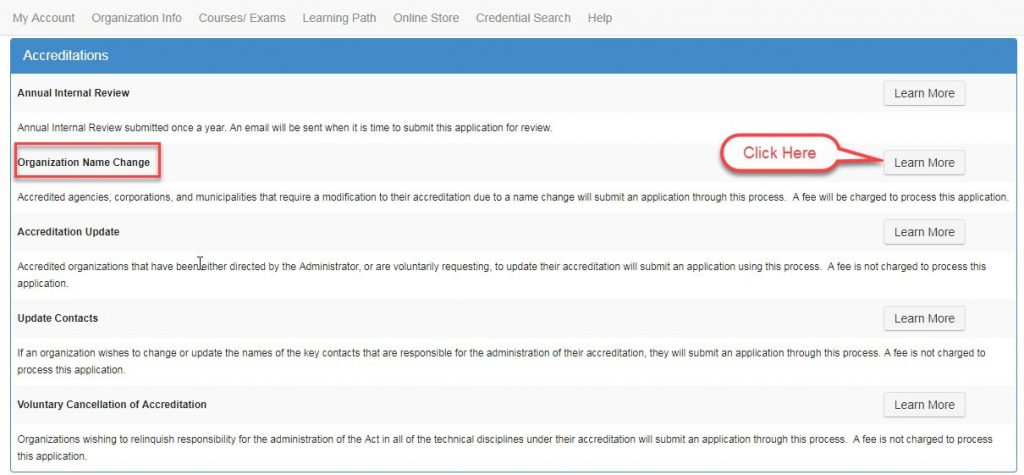
b. From the Accreditations page, click the Learn More button to the right of the Organization Name Change application row.
c. From the Applications page review the application information and click the Apply Now button to proceed to the next step.

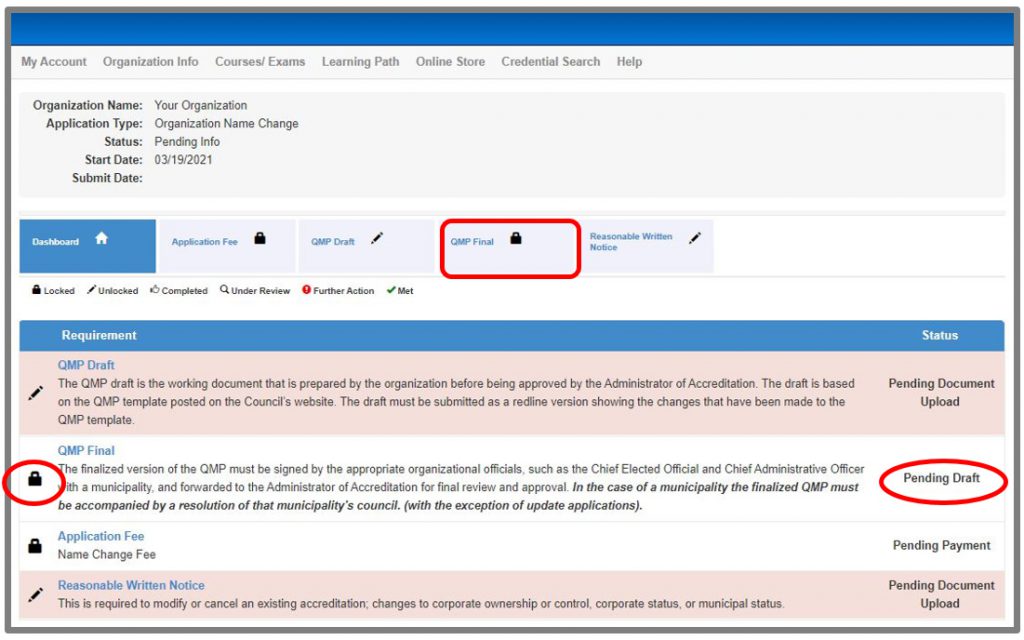
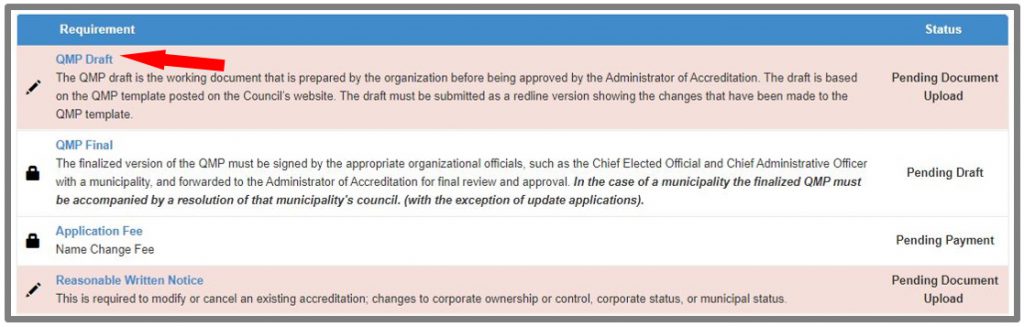
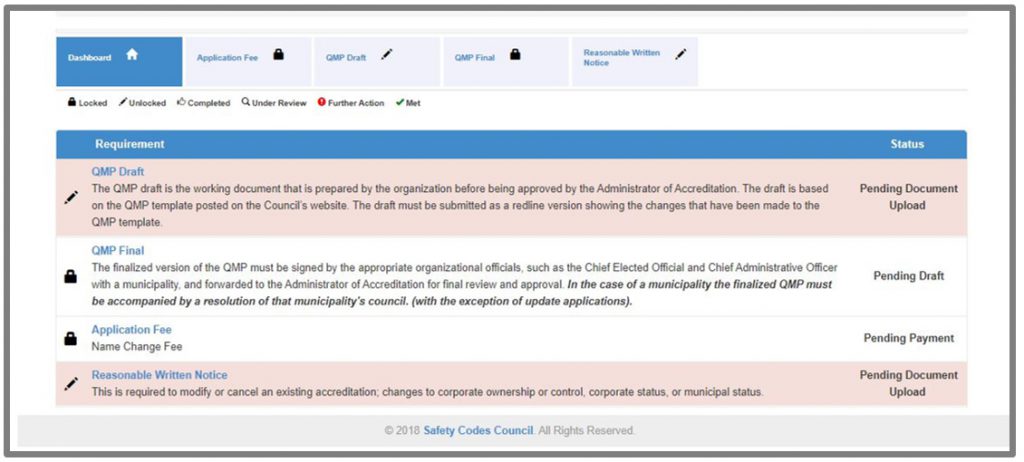
d. A screen showing the application requirements will appear.
- The requirements that must be completed in order to submit the application for the Administrator’s review are distinguishable by a pink cell background and pencil icon status.
- In the Modify Accreditation – Name Change application process, all accredited organizations are required to provide a draft and a final QMP, and Written Notice.
e. The QMP Final requirement cannot be completed until later. As a result it has been locked.
STEP 6 – Complete Application Requirements
Select a requirement to complete:
- Click the requirement from the Dashboard’s Application Requirements tabs ribbon.
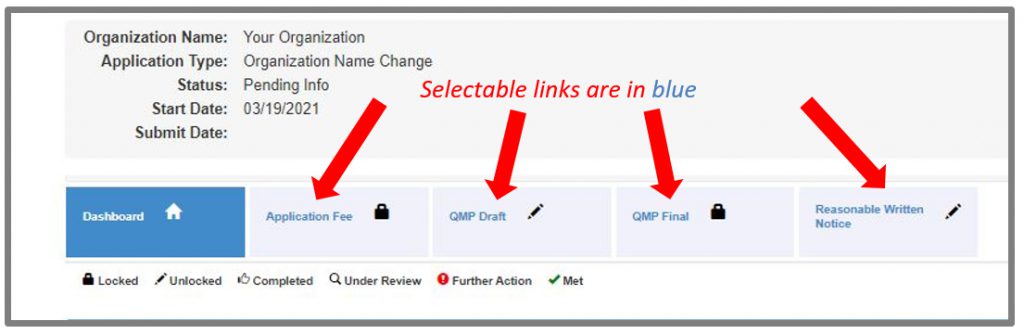
- OR, Click the requirement name (blue hyperlinked text) from the Requirement list section below.
- Clicking on any of the requirements will present a document upload screen for the applicant to attach the corresponding document to the application.
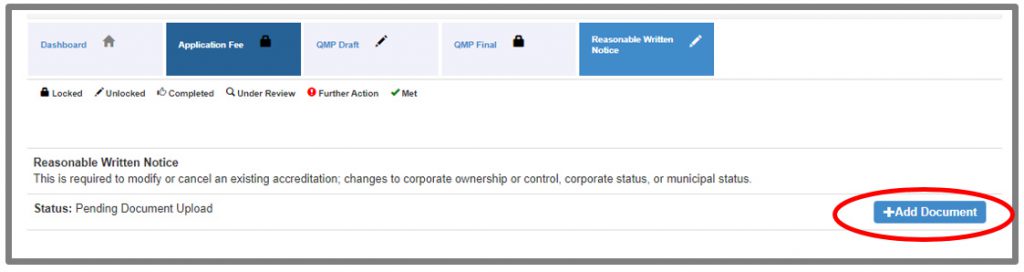
STEP 7 – Document Upload
a. From the requirement click the Add Document button.
b. From the Add – Customer Document page:
- Click the Choose File button to browse for the desired file.
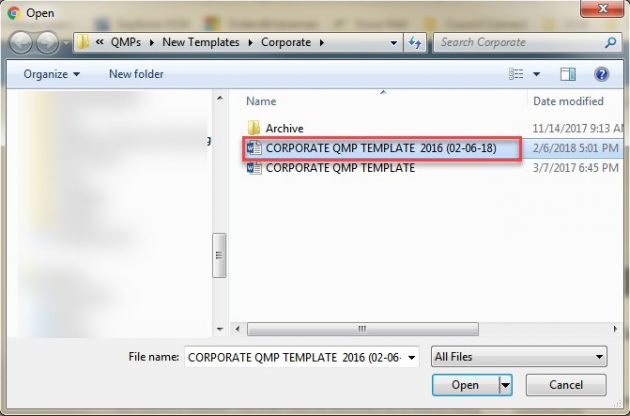
- Select the file to be uploaded.
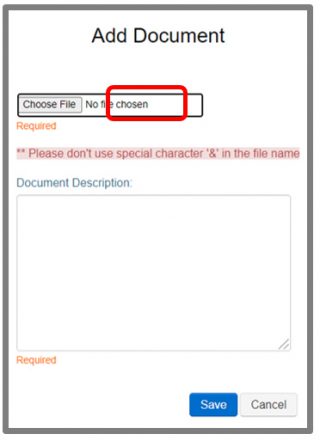
- Select the file to be uploaded. Once selected click Open.
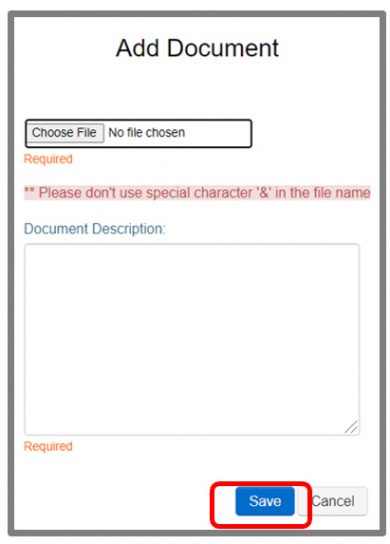
- Add a description and click on the Save button to complete the upload.
Tips: Uploaded files cannot be deleted.
To replace an uploaded file with a different version, simply repeat the upload steps above. The system will append the next incremental number to the end of the filename and remove the original file from the document list.
c. The uploaded file will display in the list of Documents at the bottom of the screen.
d. Uploaded files are automatically named by the system. The naming format is Customer ID number followed by a description of the document and an auto-incrementing number.

e. After a requirement step has been completed, review the list of requirements and changed states and statuses.
f. Click the Dashboard button in the top panel of the application screen.
g. From the application dashboard the state of the QMP Draft, and Written Notice requirements have changed from “Unlocked” to “Completed” (thumbs up).
h. The status next to each requirement on the list now reads “Document Uploaded.”
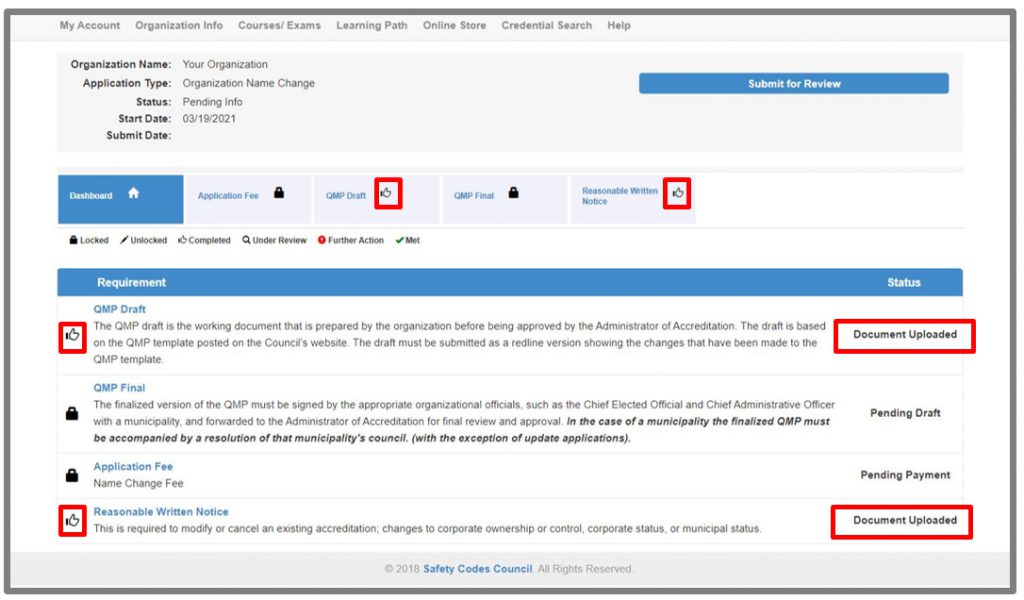
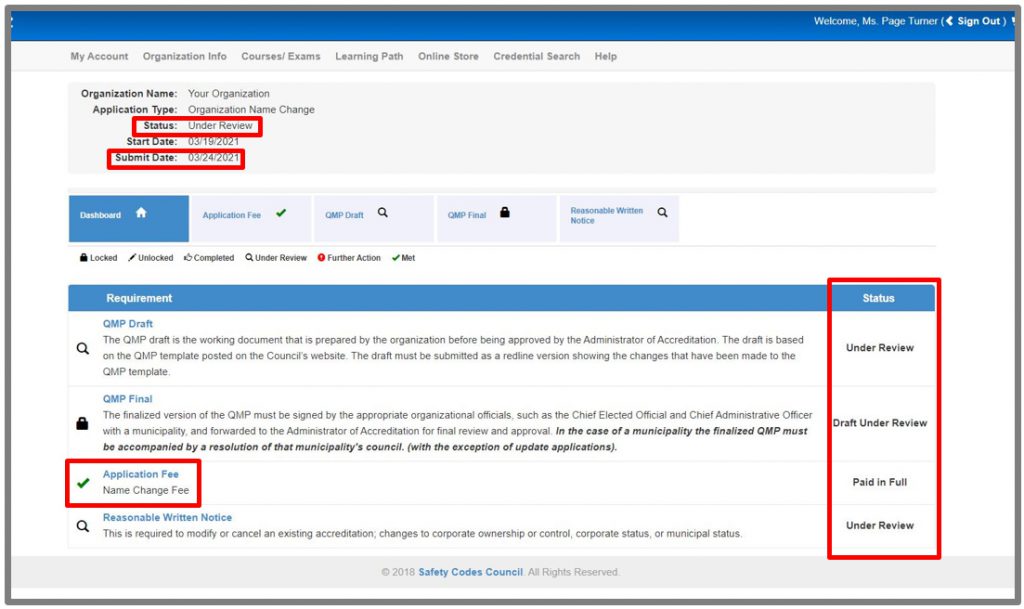
i. Once the application has been submitted for Council review, the state of all requirements with document upload requirements will change to “Under Review.”
STEP 8 – Submit Application
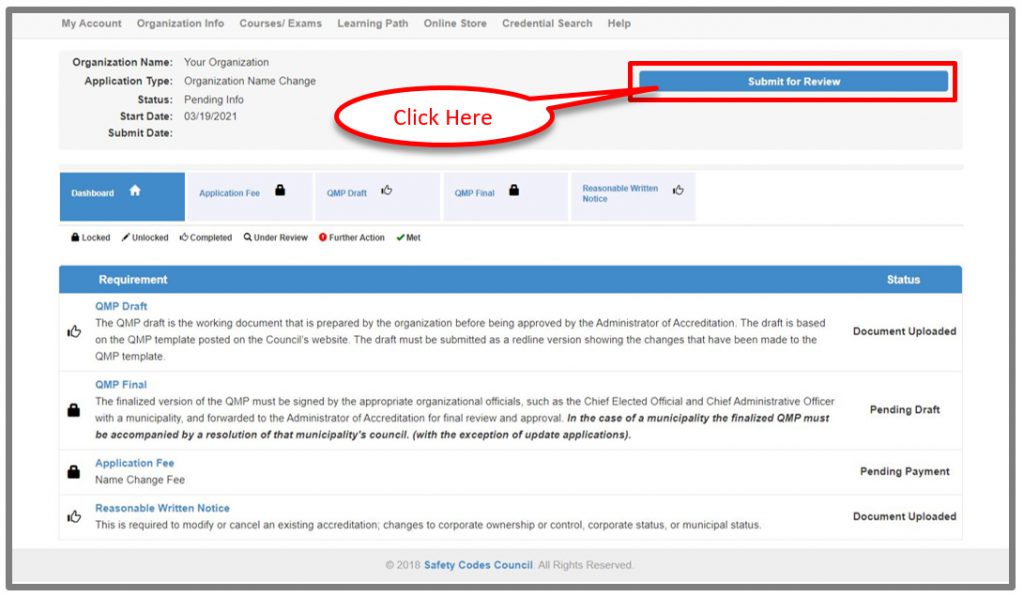
a. Once all the requirements have been completed the application is ready to submit.
- A Submit For Review button (below) will display on the upper right corner of the application screen.
- The statuses of all requirements on the requirements ribbon (below) and on the left side of the requirements in the table should show as either Completed or Locked.
- The status (below) of each of the requirements in the requirements table will have changed to indicate the action has been completed (e.g. Document Uploaded; Pending Draft, Document Approved, etc.).
b. Click the Submit Application button to advance to the finalize steps to submit for Council’s review.
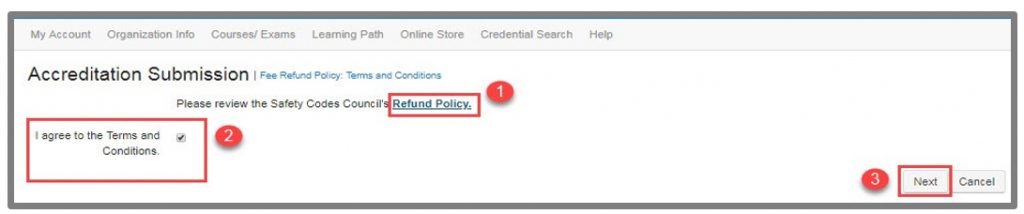
c. On the Application Submission screen shown below, click the link provided (1) to review Council’s refund policy if desired.
d. Click the “I agree to the Terms and Conditions” (2) checkbox to display the Next button.
e. Click Next. (3).
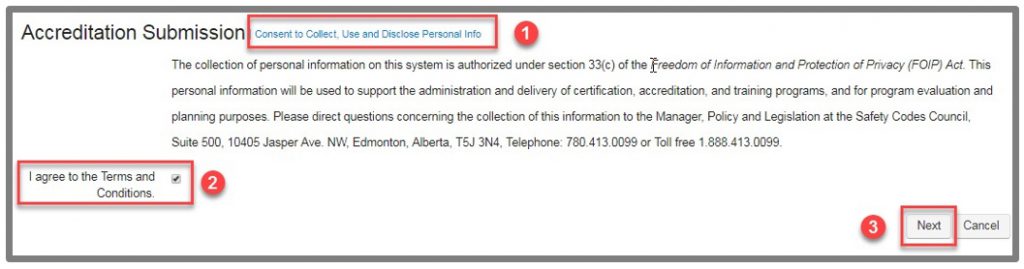
f. Review the information provided on the FOIP screen, click the link provided (1) to review Council’s policy if desired.
g. Click the “I agree to the Terms and Conditions” checkbox (2) to display the Next button.
h. Click Next. (3).
i. On the Accreditation Selection screen, place a check in the box to the left of the discipline(s) being applied for and click Continue.
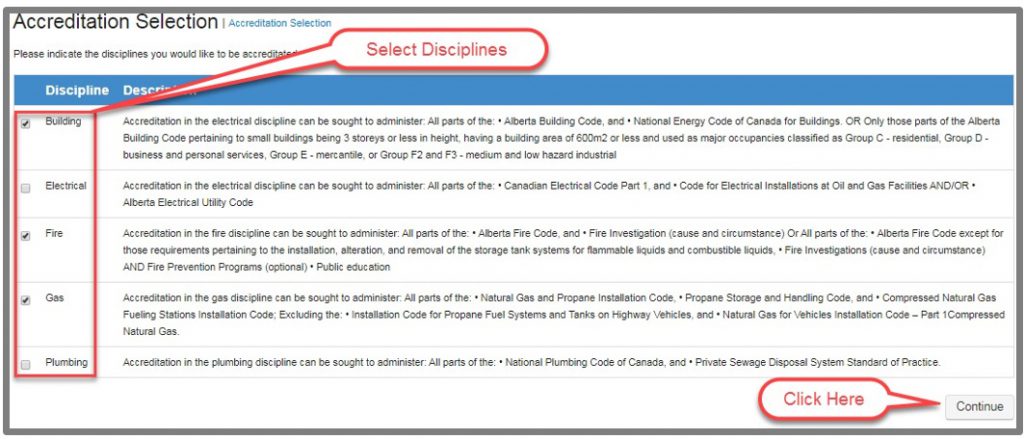
j. The system will tally the fees based on the number of disciplines applied for (one fee of $100 per discipline).
k. Since three disciplines were selected in the example shown above, the system shows a breakdown of the fees presented in the Shopping Cart screen.
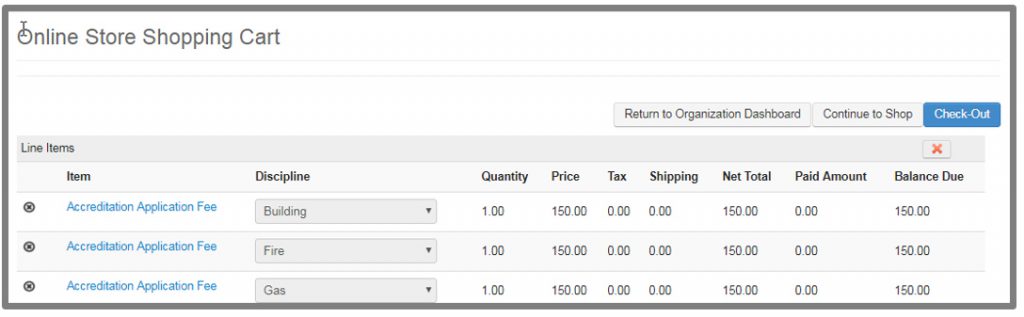
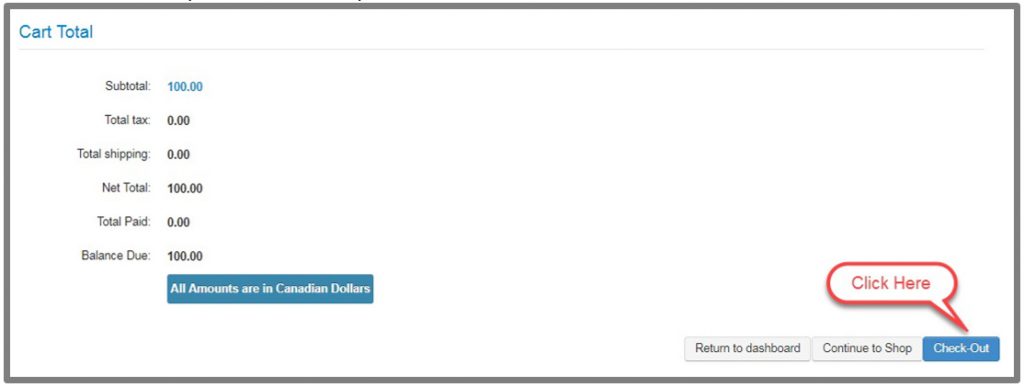
l. The subtotal of all fees is presented in the Cart Total area of the screen. Click the Check Out
button to proceed with the purchase.
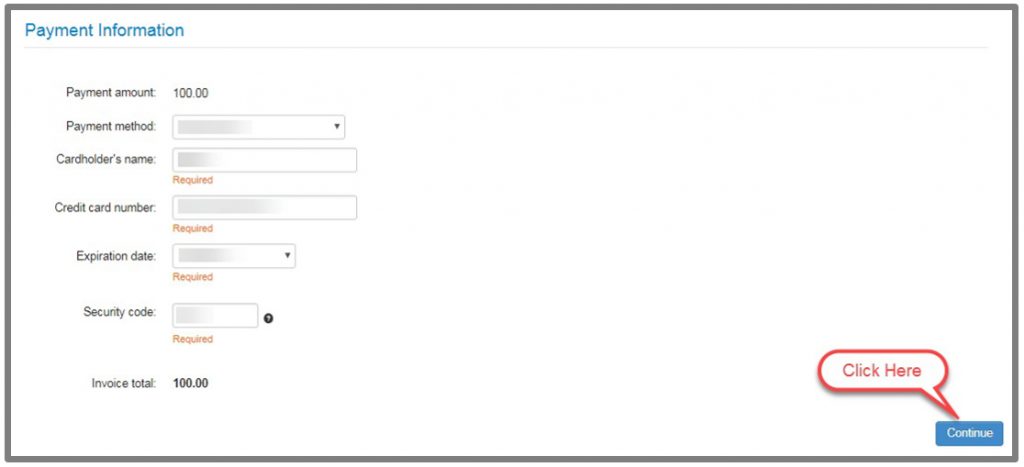
m. Complete and review the payment details. When satisfied, click the Continue button.
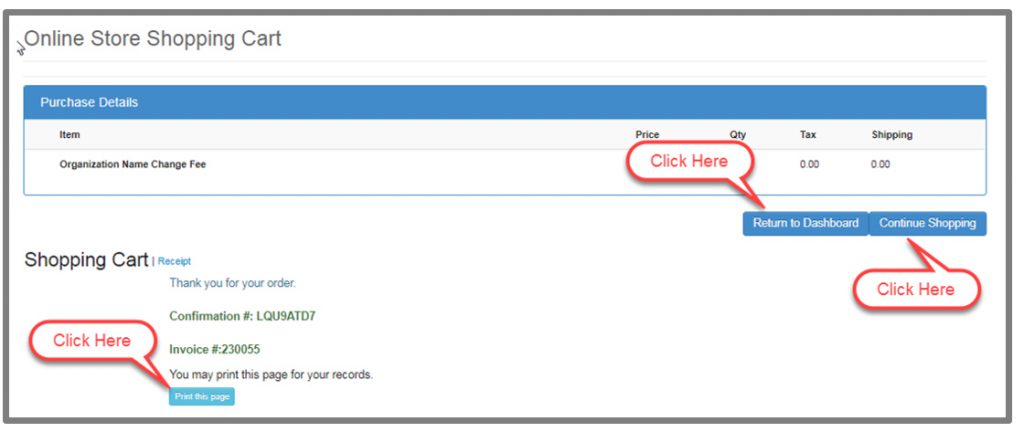
n. A confirmation screen will appear once the transaction has been finalized.
- Click the Print this page button to print a copy of the confirmation screen.
- Click Continue Shopping to make additional purchases if desired. Otherwise, click one of the menu options at the top of the screen to perform other activities including returning to your home page by clicking the Return to Organization Dashboard button.
o. Once the payment of the fees for the application has been made, the status of the application itself will change automatically to Under Review and the Submit date field will populate with the date the payment was made.
p. The requirements will also display with an updated state and status (e.g. Application Fee shows a Met state and a Paid in Full status).
STEP 9 – Monitor Application Status
a. An automated email confirming receipt of the submitted request will be sent to the email address specified on the account of the organization’s authorized individual.
b. Applications that have been submitted and are being processed by Council staff will display under the My Open Applications group on the organization’s dashboard in Council Connect.
- The starting status is “Pending Info.”
- Once all initial requirements have been completed and the application has been submitted for council review, the status will be set to “Under Review.”
- Once the Council has completed their review, the status will be set to “Completed.”
c. Click the View Application link to continue working on the application or to review the submitted application.

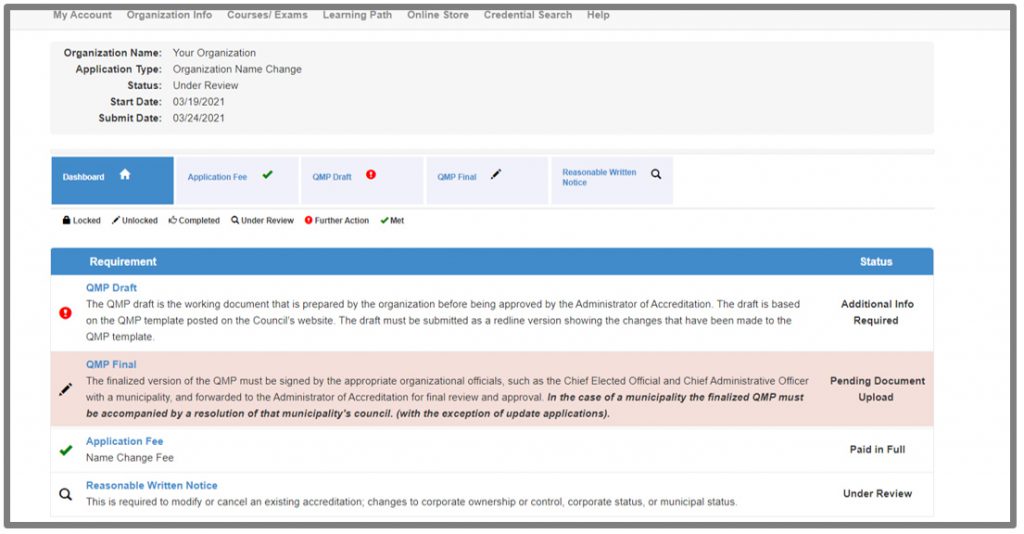
STEP 10 – Request for Further Information
a. As the Council reviews and processes an application and edits to the draft QMP, additional information and documentation may be requested.
b. The Council will send an email notification to the organization’s representative detailing the additional action required in order to continue processing the application.
c. Instructions to respond will be included in the Council’s email.
d. The requirement step in Council Connect may also be unlocked so that the organization’s representative can provide the necessary information/edits using the same process as used when the application was initially submitted. Monitoring the status of the application (see 9. Monitor Application Status above) will also alert the organization’s representative of the need to provide further information.
STEP 11 – Notification to Submit Final Documents
a. Once the QMP Draft, and Reasonable Written Notice have been reviewed and signed off by the Administrator, the organization’s representative will be notified to submit a finalized and signed QMP.
b. The QMP Final document will be unlocked, and can be uploaded by following the same steps as outlined above in 7. Document Upload.
STEP 12 – Notification of Decision
a. Once the application has been fully processed to completion, the status of the application will be changed to Completed, a written notice, and the signed QMP will be sent by mail to the organization’s representative.
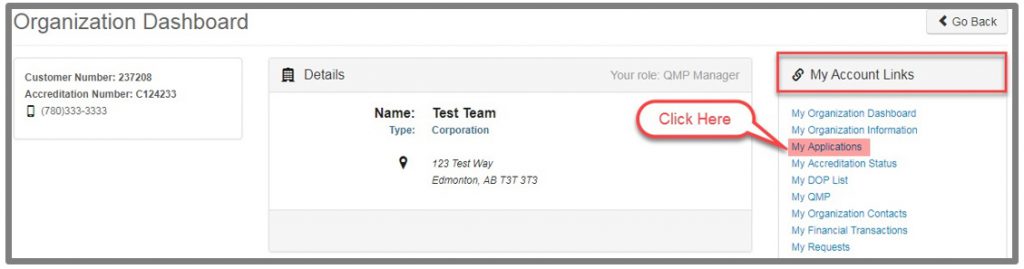
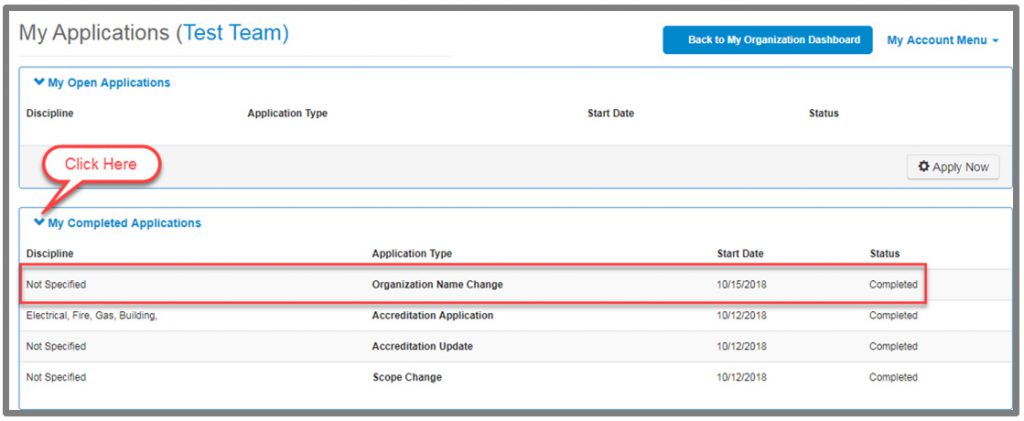
b. Applications that have been completed will be listed in the My Applications screen of an organization’s dashboard.
c. Click My Applications in the My Account Links menu.
d. If not already expanded, click the V icon next to the My Completed Applications title to display a list of the organization’s completed applications.
Deleting or Cancelling an Application for Accreditation
Contact the council (by email or by phone) to delete or cancel an application for Accreditation, regardless of the status of the application (e.g. in Progress or submitted)
If assistance or further information is required on the application process, you can contact the Accreditation Department toll free at 1-888-413-0099, or, by email at Accreditation@safetycodes.ab.ca. Further information on accreditation under the Safety Codes Act can also be found here.